Tap-Testing Feed Mills
Open full view...Categories: Using MillMax Tapping Different Cutters
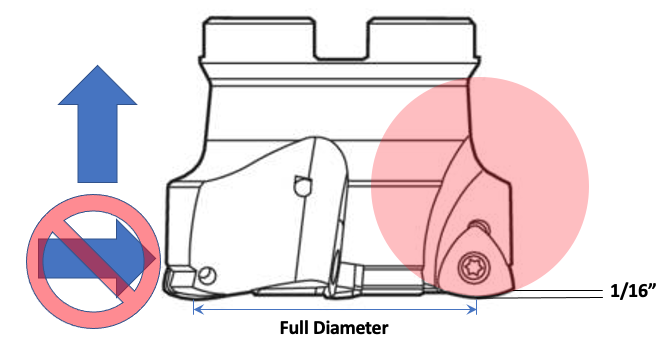
High feed mills by design have a very low axial depth of cut. To recover the metal removal rate lost by such a small depth of cut, they are most often are suggested to be run at full width of cut and using very high feed rates. They exploit axial chip-thinning by increasing the effective radius of the insert. Because of this, that the tool cuts only on the bottom and not on the sides, most of the cutting forces are redirected axially rather than radially like a traditional milling cutter.
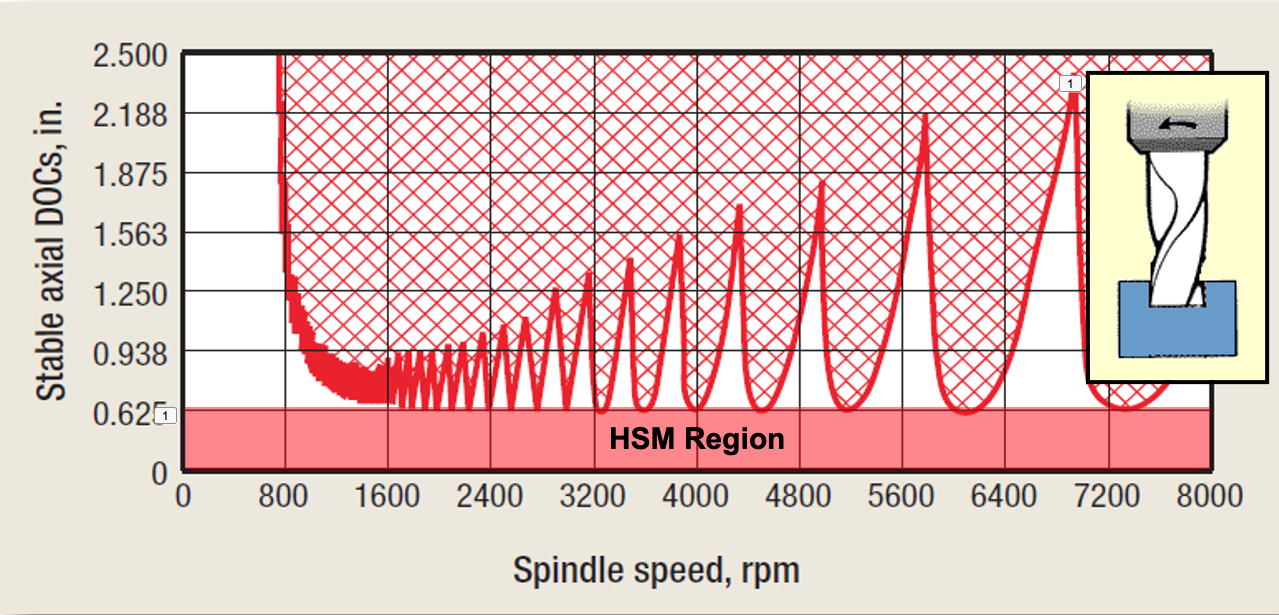
Feed mills are exploiting what we call the b-critical limit represented by the red (HSM) region on the stability lobe diagram where the deflection is so low that any speed will be stable. To determine the b-critical limit, the algorithm uses the corner radius of milling cutter among other factors. The very large effective radius may cause our b-critical calculations to be off (as well as create very rough surface finishes, non-straight walls and poor insert life).
With tap-testing the speed predictions will be VERY ACCURATE. Because of the low maximum depth of cut and the impact the large effective radius of the insert has on our calculations, the resulting Dashboard may often will appear all green. It is likely right, but you still want to try and pick the best speeds. You can see these by going to Setup and the Tool Details. Double the Length, Cutting Edge (APMX). You are going to want to change this back before delivering the Dashboard. Red zones should now appear, if they don't, double it again. Select a speed that is within a distinct green zone while respecting the manufacturer's SFM limits. Because you are likely cutting a full slot, the teeth have no time too cool and the inserts are very small you can't exceed the SFM limits by much without burning up the cutting edges. Simply toggle the RPM field on the Dashboard to SFM.
However, sometimes because of the changing force model caused by the oversized effective radius described above, our depth of cut predictions may be too conservative and the Dashboard will appear all red. In these cases, reduce the depth of cut on the Dashboard until green zones appear. Those are your good stable speeds. The tool should still run at the maximum depth of cut. To adjust the material properties so the Dashboard will be correct for the customer, follow this procedure to calibrate the Dashboard. First set the corner radius to zero (do not use the program or effective radius), then follow these instructions: